
Have you ever wondered why some people’s gourd photographs look so nice and others are blurry, cluttered, unfocused, or the gourd itself is so small that all you notice is the background? There are some simple solutions to achieve better results that do not require you to be an expert photographer. First of all, let me tell you that I am NOT an expert photographer – but I have learned a few basics that allow me to take nice photographs. If I can do it, almost anyone can!
Camera Basics
The trend in photography today is toward digital images, and there are some very good reasons why. The most obvious is that you get immediate feedback. Instead of waiting to take your film to the store and have it developed and printed, you can look at the images on your camera and see right away if your results are good. If the picture is out of focus or poorly lit, it is easy to take additional pictures on a digital camera until you get it right. Many digital cameras also have a small screen so you can see exactly what you are getting in your picture. Another advantage of digital photography is that it is easy to fix small errors such as cropping the image to remove background clutter. This is not to say that good images can’t be taken with a film camera; it is just harder to do unless you have some experience, a decent camera and some basic knowledge. Be aware that the lens limitations of some older, inexpensive, or disposable type cameras will make it impossible to produce good close up photos of any reasonable detail, no matter how skillful the photographer.
The type of viewfinder is something to consider when using or buying a camera. “Through the lens” viewfinders are easiest to work with; what you see in the viewfinder is the same as what the lens actually sees. Point and shoot cameras often have an optical viewfinder through which you compose your shots. This type of viewfinder is offset somewhat from the lens. This means that the closer you get to a subject, the more likely it is that you are seeing a view that is different from the one seen by the lens. You can adjust for this by slightly shifting the camera in the direction of the viewfinder, but you’ll need some practice so you don’t cut off portions of your subject matter.
We won’t address camera brands or many specifics here; that is such a broad topic that it could take up the whole magazine and still wouldn’t begin to address all the brands, models, and features that are available. If you are in the market for a camera, know your own skill level and interest, and then let a good camera salesman or photographer suggest some models that might be appropriate for what you would like to do. If you have spent your life taking photos with a simple point and shoot camera, you probably don’t want to get a camera that has a myriad of settings and an instruction manual that is 200 pages long. If you have more experience and a desire to take something more than just snapshots, you will want to have a camera with more features.
Some special considerations:
When buying a digital camera, keep in mind that the higher the number of the pixels, the higher the resolution of the photographs and the better the quality. If this number is too low, your pictures will be of lower quality. It the number is high, the camera price may climb out of your budget. Digital cameras that are around 3 megapixels are probably more than adequate for the casual photographer. For the best quality, always take digital photographs at the highest possible resolution. If necessary, photo editing software can later be used to reduce the size of the photo,
Also, different cameras have different focal ranges; most digital and some film cameras have a “macro” lens or setting that allows you to take extreme close-ups. Even if your camera does not have this ability, it may be possible to add a special close up lens for extremely close shots. Inexpensive film cameras are not capable of taking good photographs when the subject is closer than a few feet.
Background
Simple is better when photographing gourds. You are trying to highlight your beautiful creation, not the clutter on your kitchen counter! In most cases, a simple white background is the best, but for special shots other colors can also be used. A large piece of mat board, poster board or even a roll of heavy paper can be used for an effective, seam free background. Tape or clamp the front edge of the board to the table, then curve it upwards and prop or tape it against the wall or other object. This will give you a curved, seamless background that will show your subject off well. You can also use fabric or other material as a backdrop, but these will often show wrinkles, lint and other flaws that will be magnified in the final picture.
Preparing the Gourd and Composing the Photograph
Gourds that are coated with a glossy finish can add additional challenges to lighting. Some possible solutions to this problem are to take the picture before the glossy finish has been applied, spray the gourd with a dulling finish such as hairspray (that can be removed after the picture has been taken) or to use a good lighting setup that provides diffused light. Check to make sure that there are no obvious finger marks on the surface of the gourd or crooked embellishments before taking the photo. Remember that your gourd is the focal point of the picture. Try to take the picture so the gourd is centered in the photograph without showing an excessive amount of background. Pay attention to ensure that the gourd appears upright and level in the photo. Decorative accents such as rocks, pinecones or other appropriate material can be added to the picture for visual interest, but always remember that the gourd should be the predominant feature.
Lighting
The proper lighting can make a vast difference in the overall quality of your pictures. Ideally, you want to bathe the gourd in soft, even light. The flash on a camera is designed to illuminate a large area evenly, but when you're working with close-up photography, the bright burst from the flash will overwhelm your object and cause prominent shadows, hotspots and reflections. It's best to turn off your flash and rely on external illumination – either natural light or with the use of a simple indoor lighting setup.
Most digital cameras have white balance settings like "daylight", "cloudy day", "fluorescent", and "incandescent" or "indoor". These settings will make adjustments to the color balance of your photographs. Be sure your camera is on the proper setting for the type of lighting you are using.
Even natural outdoor lighting works best when it is indirect. Photos that are taken out in the bright sunlight will have harsh shadows and bright spots. It is better to take the photographs on a cloudy day or under a covered area that is out of the direct sunlight.
When working indoors, the lighting will be most effective if it is also from an indirect source. The goal is to provide plenty of light while reducing glare and hard shadows. The simplest setup is to place the gourd on a curved backdrop that has been set up perpendicularly to a large window that receives bright, indirect light. An additional sheet of white poster board can be set up next to the backdrop and parallel to the window, and adjusted so that it will reflect additional light onto the gourd.
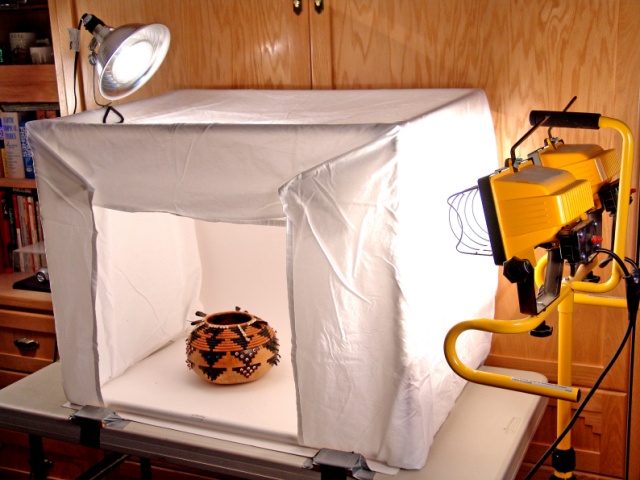
Professional photographers use fancy setups with combinations of commercial lighting, flash umbrellas, and reflectors. However, a simple homemade “light tent” can produce professional quality lighting, and it can be fabricated with easily found household objects. Create a frame made from thin PVC pipe, wood, or even a large cardboard box with most of the cardboard cut away. This frame is then draped with a white bed sheet or other thin white material such as muslin. Plastic diffuser panels that are sold for overhead lighting fixtures also work well. Lights can be set up so that the light will pass through the material and provide soft illumination for the object placed within the frame. Halogen shop lights or regular bulbs in large metal reflectors will provide plenty of light. Clamp on lights with metal reflectors are inexpensive and are readily available at hardware and home stores. Place 2-3 lights so they will shine into the top and sides of the light tent. Shining the lights through the fabric will diffuse it and soften the shadows. *Be careful of the heat generated by the lights and keep them far enough from the fabric to avoid scorching.
No matter which method of lighting you choose, your pictures will be better if you are able to use a tripod. This will ensure that your camera remains absolutely still and there will be less chance of blurry pictures. Most "out of focus" shots look blurry because the camera moved a tiny bit while the picture was being exposed. You can also use the camera's self-timer or a cable release to activate the shutter, reducing the possibility of camera movement. At close range, even the slightest vibration can be very noticeable.
Tips for Photographing Gourds
This article appeared in the Winter 2006 issue of the American Gourd Society magazine, "The Gourd". If you like this article and would like to receive their quarterly magazine, please become a member of the AGS at www.americangourdsociety.org

Comparison of different megapixels
A crude but highly functional light tent, made from the following parts: 3 ten foot lengths – 1/2 inch PVC pipe, 4 pieces – 3 way PVC connectors, an old white sheet, and one large piece of white mat board for the backdrop. The small clamp on reflector light was very inexpensive; this setup also uses a set of halogen work lights that were already on hand. The whole setup including the pipe, fittings, reflector lamp and mat board cost about $20. (The halogen worklamps and old sheet were not included in the cost.) Other light sources such as light from a bright window, table lamps or photo lights can substituted.
Notice that there are no harsh shadows around the gourd, and no bright reflections off of the gourd surface.
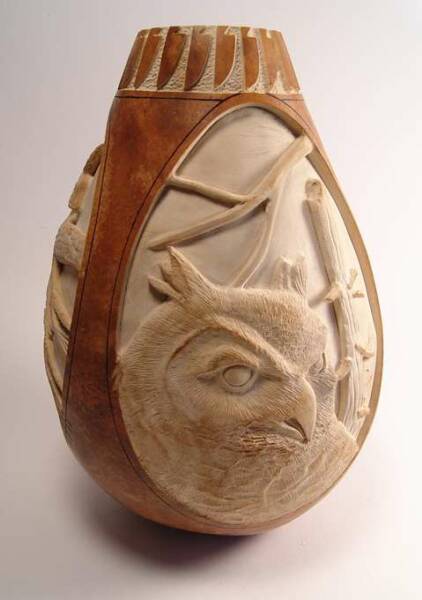
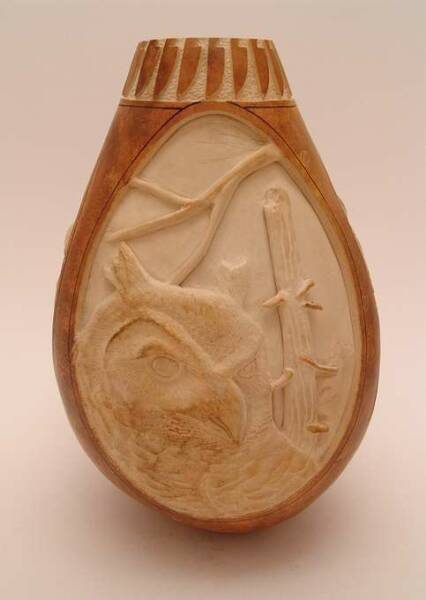
Normal lighting is shown on the left. The photo on the right was taken with a strong light from the right side. This extra light creates dramatic shadows and better shows the depth of carving.
Conclusion
If you plan to submit photographs for juried shows, contest entries, or magazine publication, it is important to send in the best pictures possible. Even if you only want to take pictures to show off your gourds to relatives and friends, it will be nice to show them a photograph that has enough detail to really highlight your art! While some of this photography information might sound overwhelming, the use of even a few of the tips in this basic article will lead to much better pictures.
More in-depth information on all aspects of photography is plentiful at your local library or on the internet.
Specialty Lighting
In some circumstances, you may want to adjust the lighting to intentionally cast shadows. "Side lighting" is most effective when you are trying to show depth or dimension, such as in relief carving. The addition of a strong light from one side will cast enough shadow to make these dimensional details more pronounced.
Here is an inexpensive (under $35) complete set up for photographing gourds and small items. It comes with everything - tent, backdrops, lights, tripods and carrying case. You can purchase this system here.
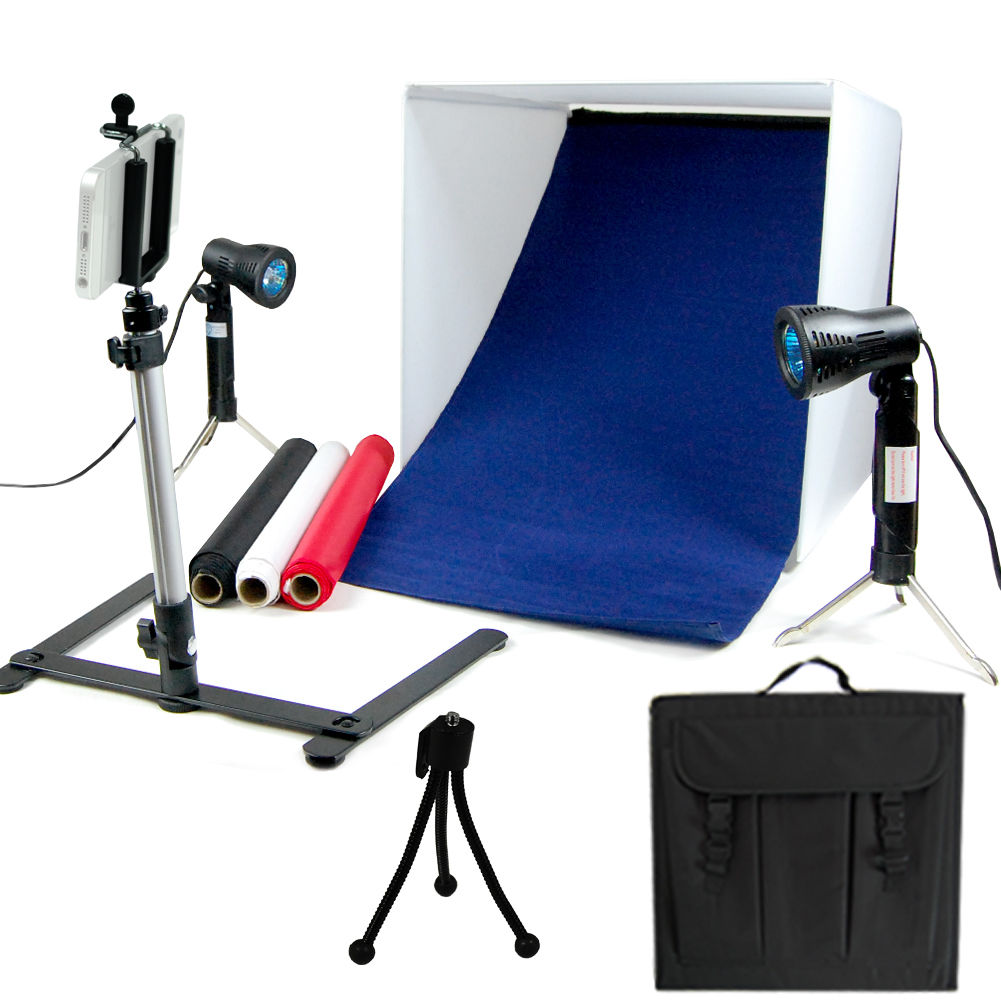
This site accepts PayPal and debit/credit cards, Please call 319 855-9665 if you need assistance.