Want to read more? Click on the titles below to see some good drum making books.
Make a Basic Gourd Drum
You will need the following supplies:
Gourd cut and cleaned
Goatskin rawhide for heads and lacing
Sharp heavy duty scissors
Awl or small hole punch
Pencil
Large Water container
Small hand or kitchen sized towel
Optional items:
Small metal ring
Cord for lacing or to cover ring
Please read through all instructions carefully before starting your drum!
Preparing the Gourd
Select a nice SOLID gourd. The thickness of the gourd shell will play a part in the eventual tone of the drum. A thick shelled gourd will produce a deeper pitch than a thinner shelled gourd. Either is fine, but it is important that the shell is hard and firm. Although you can make a solid bottom drum, you will get the best sound when the gourd shell has openings at both top and bottom. Both openings can be covered with "heads" (drum skins) OR make a drum that has a large opening covered with a top head and a smaller uncovered opening at the bottom. This will allow the gourd to act as a resonator and will produce a good sound. A large bushel gourd shape works well for a two headed drum, while a bottle gourd shape works especially well for an open ended drum. Cut the openings in the gourd, and make sure they are flat and smooth. Tape sandpaper to a flat surface, and rotate the cut gourd on the sandpaper until all high spots are removed and the opening is flat. Clean the interior of the gourd as well as possible, as any pulp left behind will muffle the drum sound. If you wish to decorate the exterior of the gourd shell, do this before assembling the drum.
About Rawhide
Rawhide is skin that has not been tanned. This type of skin will soften and stretch when wet, and as it dries the skin will tighten and the natural glues found in the skin will harden. This will make a very resonant drum. Do not use tanned or finished skins such as suede, as they have been chemically treated and will NOT produce a good sound. Goatskin rawhide is thinner than rawhide made from many other types of skins, is easier to work with and less likely to over tighten as it dries. This reduces the chance of cracking the gourd shell as the skin dries. If you use cow or other heavier rawhide, be sure you have a very thick, strong gourd!
Preparing the Lacing
Because rawhide stretches when wet and tightens as it dries, you can get good tension on the drum head when you use rawhide lacing. When you cut it from the same material, the lacing also matches the color and texture of the head and blends into the design of your drum. (You can substitute heavy non-stretch cording if desired.) To make lacing, use a good sharp pair of scissors to trim a narrow strip around the outside edge of a round rawhide drum skin. If you use a large size drum skin, you may be able to cut the lacing from the outside edge and make the drum head from the inside part of the same skin. Cut the strip about 1/4 - 3/8" wide in a continuous spiral around the skin until you have about 12 -15 feet of lacing. (*Note: It is always better to cut the lace too thick rather than too thin. When you are tightening up the drum, the lace will stretch and get thinner, and you do not want it to break.) Throw the lacing into a container of lukewarm water and let it soak until it is soft. Never use hot water, as this will damage the tissue of the skin! If desired, tie one end of the wet lace to a stationary object and gently stretch the lacing outwards to pull it into a straight length. The lacing will stretch and become slightly distorted during this operation. If so, trim any edges where necessary to even it up. This extra operation will allow you to make sure there are no weak spots that might break during the lacing process.
Use this Link Button for drum skins in several sizes and metal hoops!
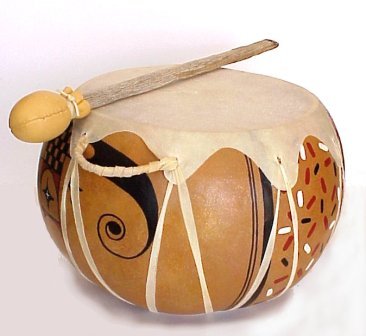
Create a simple pueblo style drum!
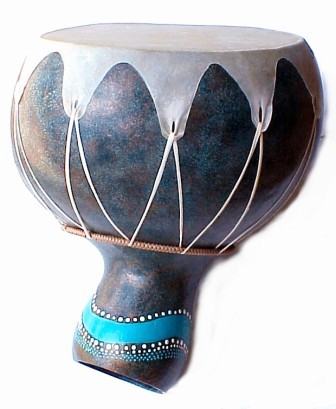
A large bottle gourd and a metal ring was used for this drum.
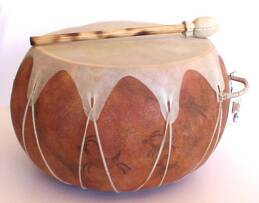
A large bushel gourd and two drum skins were used for this drum.
Gourd, Gourd art, Gourd drum, Gourd Musical Instrument Drum building Drum construction
Preparing the Skin
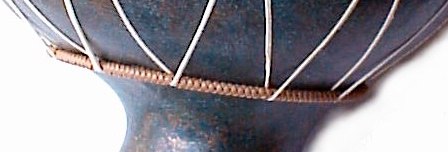
Choose a skin that is reasonably even in thickness, and make sure it has no holes or tears. Lay the dry skin on a flat surface with the roughest side up, and center the gourd opening on top of the skin. Use a pencil to lightly trace around the outside edge of the cut gourd. Set the gourd aside, and draw a second circle around this first mark, but about 1" wider on all sides. Draw a third circle that is about 2 1/2" wider than the original mark. In between the largest two circles, draw a wavy line with finger-like projections. The number of projections will depend on the size of your drum, but a good number is anywhere from 8-12. Be sure the projections are evenly spaced around the drum skin so the lacing will provide an even tension all the way around the skin. The more projections, the more lacing you will need. (*Note: By cutting projections instead of a solid circle, the skin will lie flatter and smoother without small wrinkles between the lacing holes after stretching is completed.) Trim the skin where you have marked this wavy line. Next, use your hole punch or awl to make a hole in each of the projections. The holes should be at least 1" away from the edges of the skin. Perfectly round holes made by one of these methods are less likely to tear. *If you are doing a double sided drum, repeat the same process for the second skin and make sure both skins have the same number of projections!
Optional:
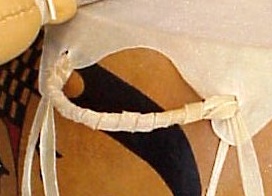
If you are making a single head drum using an opening at the bottom in place of a second skin, you will need something to lace the skin to. You can use a metal ring for this purpose. Select a ring that will not slide up over the gourd but is small enough that it rests somewhere on the bottom part of the gourd shell. Cover the ring completely by wrapping with decorative lacing or cording.
Soaking the Skin
Before assembling the drum, the skin needs to be soaked until it is soft. Use the sink or other large container for this, and fill it with lukewarm water. The time needed will vary depending on the thickness and type of skin used. Make sure the skin is totally submerged. Place an object such as a drinking glass on top of the skin if necessary to make sure the skin stays completely submerged.
Lacing the drum
Plan ahead - once you start the lacing process, you shouldn't stop until it is finished! Before lacing, clean the wet skin(s) of any remaining pencil marks by rubbing them lightly with a damp towel. Place the circle of soaked skin rough side down onto the gourd. (*Note: If you are making a double headed drum, place the second skin across the bottom opening and stagger the holes across from each other. If you are making a single headed drum, place the ring on the bottom of the gourd.) Insert the lace into a hole in the top skin and tie a very loose overhand knot to hold it, leaving a 6 -12" tail. Work the other end of the lace back and forth from the top head to the bottom head or ring. Be sure to enter and exit the holes in the skin from the same direction each time. Continue this process until the lacing has been pulled through all the holes in the skin and you have returned to the starting place. This initial lacing operation should be somewhat loose to allow for adjustments and repositioning. (*Note: If the skin or lacing starts to dry out during the lacing process, use a wet towel to rewet and resoften. Loose lacing may also be dipped directly into water.) In the next step, the slack of the lace will be taken up, and the drum skin will be tightened. Begin by working the lace from one end to the other, pulling gently but firmly as you go around the drum. Tighten and pull up any slack as you go. Once the slack has been all worked through, begin the whole process again, and then again, until it feels like you can't get any more slack out of the lace. Pull firmly on the lace, but be careful not to break it, or tear the holes in the drum head; be especially careful if you are pulling on a thin piece of lace. Once you have pulled and tightened the slack all the way around the drum several times, tie the ends of the lacing together in a square knot next to one of the holes in the top head. Trim, or leave tails on both ends of the lace if you want to add a handle.
Adding a handle
To make a handle, take the shortest tail and tie a simple overhand knot around the lacing going both into and out of the adjacent hole in the skin. Leave just enough slack in the handle to insert your fingers comfortably. Use the longer tail to wrap in a spiral pattern around and around this handle. When you reach the knot on the other end, tie the two ends off, trim and tuck the loose ends back into the lacing itself. As the leather dries, it will shrink to become firm and tight.
Drying
Place the completed gourd drum in a warm, airy place. Avoid excess heat; allow the skin to dry slowly and naturally. Drying time will depend on factors such as skin thickness, temperature and humidity. Setting the drum aside overnight is usually sufficient. When it dries out, and if you put enough tension into the wet rawhide, you will have a wonderful sounding resonant drum; if you didn't, your drum may sound dull and flat. You can always take apart your drum and start over. The skin and gourd will be fine, but you will probably have to cut new lace.
You may feel free to print this page for your own personal use. Please do not print and distribute to others or in classes, etc. without permission. *You may link to this tutorial, however, you must link here rather than put up your own page.